Mold Prevention Tampa: What Should I Do After My AC Leaks To Prevent Mold?
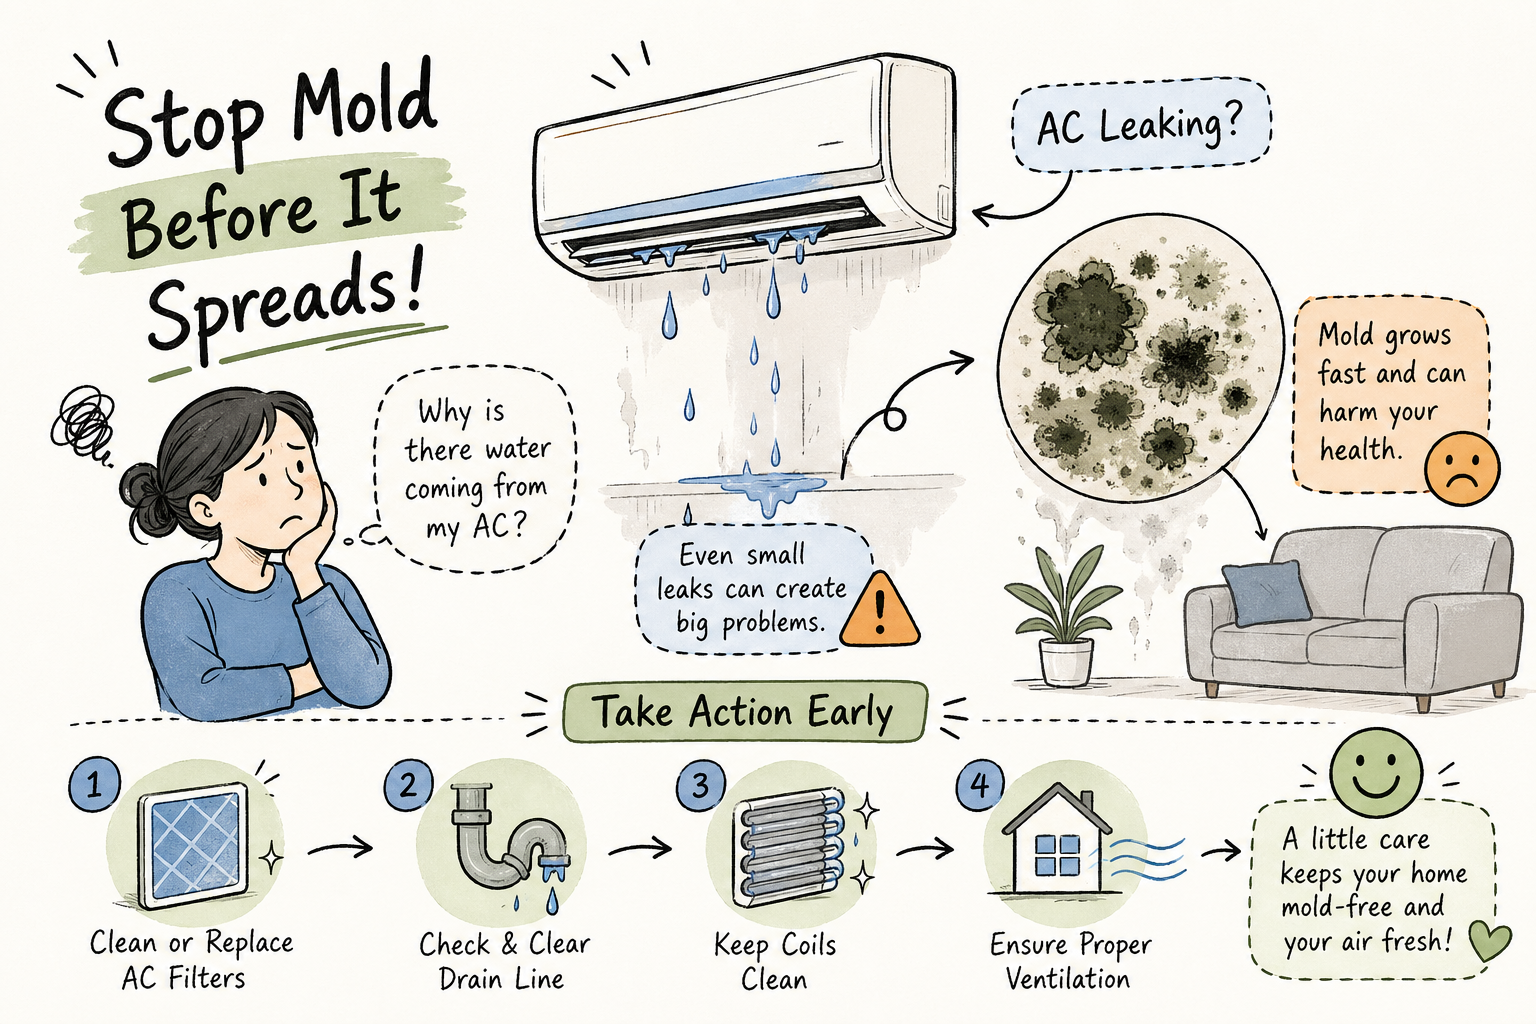
What should I do after my AC unit leaks to prevent mold? In Florida, that question needs an answer within hours, not days. The same subtropical heat and humidity that define life here compress the window between a wet ceiling and an active mold colony down to 24, 48 hours. The moment water contacts your drywall, insulation, or subfloor, the clock starts running.
What you do in the first few hours determines whether this stays an AC leak cleanup job or turns into a full AC mold remediation project. The steps are not complicated. But they need to happen in the right order, and they need to happen fast. This guide walks through each one, from killing power to the unit all the way to knowing when a professional needs to close the loop.
1. What should I do after my AC unit leaks? Shut it down and stop the water at the source
Before anything else, the unit comes off. Not just at the thermostat. At the breaker. Standing water near an air handler is an electrical hazard before it is a mold hazard, and that hierarchy matters. Once power is cut, your next job is stopping new water from entering the space, because the most common cause of AC leaks in Florida homes is a clogged condensate drain line that overflows the drain pan.
Turn off the unit at the thermostat and the breaker
The thermostat stops cooling demand, but the air handler stays live until you cut the breaker. Both switches need to be off before you put your hands anywhere near the unit or the water around it. Cutting the breaker first is the step that matters most for immediate safety, it is easy to overlook in the rush to grab towels.
Locate and clear the clogged condensate drain line
The condensate drain line exits your home as a white PVC pipe, typically near the outdoor condenser unit. Take a wet/dry vacuum, seal the hose to the outdoor end of the line using a rag or towel to create suction, and run it for one to two minutes. Most clogs, algae, slime, and debris, come right out. After that, flush the line from the indoor access port with about one cup of distilled white vinegar, let it sit for 30 minutes, then follow with a gallon of water. Use vinegar or an enzyme-based drain cleaner, not bleach. Bleach corrodes aluminum components and, if the line is still partially blocked, backs up and compounds the problem. HVAC industry guidance and product manufacturers consistently recommend enzyme-based or aluminum-safe treatments for condensate systems.
2. Remove standing water and get airflow moving fast
With the leak stopped, the goal shifts to getting water out of the space before it wicks deeper into building materials. This is where most homeowners either do it right or leave enough residual moisture to fuel mold growth for weeks. The surface drying to the touch does not mean the material is dry. It means the surface is dry. The gypsum core, the paper backing, the subfloor beneath the laminate, those are still saturated.
Pull bulk water with a wet/dry vacuum before it spreads
Work the wet/dry vacuum across floors, along baseboards, inside the drain pan, and into any wall cavities you can access. Empty the vacuum reservoir frequently so suction stays strong. After the vacuum pass, mop and towel-dry remaining surface moisture. You are trying to remove as much bulk water as possible before the drying equipment takes over.
Set up fans and a dehumidifier to finish the drying process
Position fans to move air across wet surfaces, with at least one fan exhausting out a window if possible. In Florida, running a dehumidifier is not optional. Target 40, 50% relative humidity, the threshold IICRC and EPA guidance cite for preventing mold re-establishment in humid climates, and run the setup continuously for 24, 72 hours depending on how much material got saturated. The ambient outdoor humidity will work against you the entire time, which is exactly why the dehumidifier has to stay running.
3. Why the 24, 48 hour window is the one thing you can’t miss
Mold does not take weeks to appear. On porous materials like drywall and insulation, spores germinate within 24, 48 hours of sustained moisture exposure. After 72 hours, visible mold can show up on surfaces and spread into concealed cavities where it becomes far more expensive to address. In Florida specifically, ambient humidity above 60, 70% can push moisture back into materials you thought were drying, which is why a dehumidifier for mold prevention is doing real work here, not just running in the background.
What happens inside your walls when moisture stays trapped
The surface of drywall can feel completely dry while the gypsum core and paper backing remain saturated. Trapped moisture in wall cavities has no airflow and no evaporation pathway. It stays wet long enough for mold colonies to establish, and you never see it until the smell starts. The IICRC guideline is direct: beyond the 48-hour window, removal is typically safer than attempting to dry drywall in place.
Why Florida’s climate compresses the safe response window
When outdoor relative humidity stays above 60, 70%, materials that appear to be drying can re-absorb moisture from the surrounding air. This is the specific dynamic that makes Florida different from most of the country. A dehumidifier running at 40, 50% RH breaks that cycle. Without it, the drying timeline stretches, the mold growth window opens, and what started as a cleanup becomes a remediation.
4. Check for hidden moisture before you assume the worst is over
One of the most common mistakes after an AC leak is focusing only on what is visible. Water travels along joists, seeps under baseboards, and saturates insulation inside walls without leaving a waterline on the surface. Skipping hidden moisture checks is a primary reason homeowners end up making remediation calls weeks later, chasing a musty smell that simply will not clear. The cleanup is not done until you have checked the areas the water traveled through, not just where it pooled.
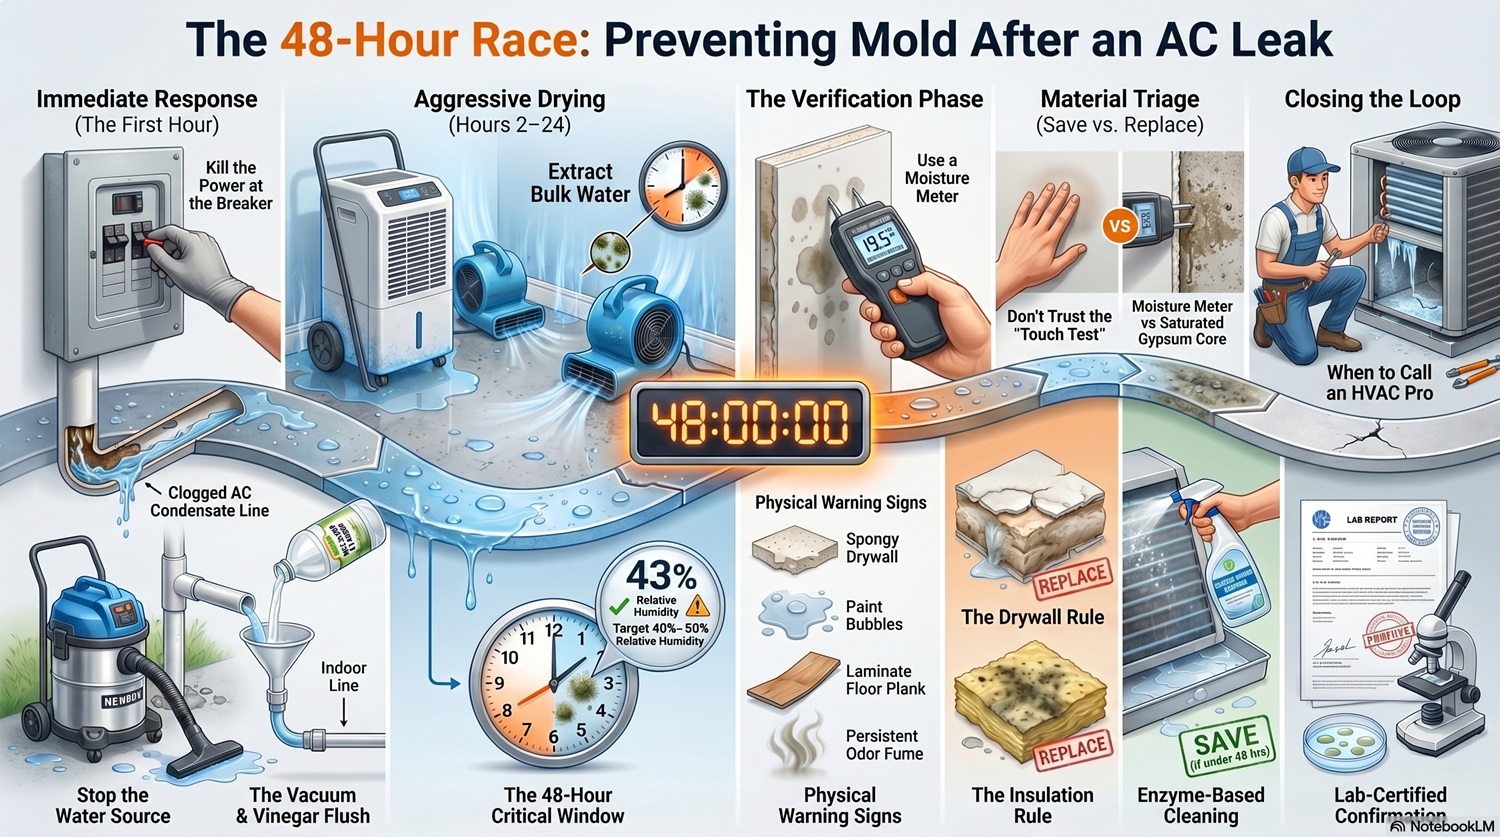
Signs of saturation you can spot without a moisture meter
Press the drywall gently with your palm. Soft or spongy texture means the material has absorbed water. Look for bubbling or peeling paint, discoloration near baseboards, warped flooring, and buckled laminate. A persistent musty odor after surface drying is not just a smell. It is a signal that moisture is still present somewhere in the material, not on it.
How to check walls, subfloor, and ceiling cavities
A basic pin-type moisture meter is available at any hardware store for under $50 and gives you actual data instead of guesswork. Test multiple points in the affected area: along baseboards, in corners, at the ceiling near the air handler, and under flooring edges. Any reading above 17% moisture content in drywall or wood framing means the area is not dry enough to close back up. Keep the drying equipment running and recheck in 24 hours before making any decisions about materials.
5. Clean what you can keep, replace what you can’t
Once moisture levels confirm the area is drying correctly, the next decision is about materials. Not everything touched by water can be saved, and trying to save materials that should be replaced is one of the primary reasons mold comes back after a homeowner-level cleanup. The criteria here are not subjective. They are based on time, moisture readings, and what the material is made of.
Which cleaners are safe for the drain pan, coils, and nearby surfaces
For drain pan cleaning and evaporator coil treatment, use enzyme-based cleaners such as Evap Plus or Pan and Drain Spray. These break down organic biofilm and mold food sources without corroding the aluminum that modern drain pans and coils are made from. Do not use bleach directly on coils. It causes corrosion and, if the drain line is even partially restricted, it backs up into the pan and creates a worse problem than the one you are trying to solve. For more on appropriate products and why bleach is often the wrong choice, see industry guidance on cleaning AC coils and drain lines. For non-metal surfaces like concrete, tile, or structurally sound painted drywall, a diluted bleach solution can be effective, follow EPA or CDC guidance on concentration and always ensure proper ventilation and PPE when working with bleach-based products.
The 48-hour rule for drywall and why wet insulation almost always gets removed
Drywall that has been wet for more than 48 hours should be removed, not dried. The same applies to any drywall that tests soft, shows discoloration, or smells musty regardless of how long it has been wet. The IICRC standard is clear on this: when in doubt, tear it out. For guidance on when to dry drywall versus when to replace it, consult a restoration professional. For insulation, the rule is simpler. Fiberglass and cellulose batts do not dry reliably. They lose R-value when compressed by moisture, they harbor mold in conditions no homeowner can monitor, and they are not worth saving. If insulation got wet, it comes out.
6. Two calls that close the loop on an AC leak
Initial cleanup handles the visible and accessible water damage. But two things remain outside what a wet/dry vacuum and a dehumidifier can confirm: whether the AC system has an underlying problem that will repeat the leak, and whether mold has already taken hold somewhere the cleanup did not reach.
When the HVAC system needs professional attention
A vinegar flush clears a drain clog. It does not fix a cracked drain pan, a failing air handler, or ice buildup on the evaporator coils. Call an HVAC technician if the condensate line clogs again after flushing, if the drain pan shows cracks or corrosion, if the air handler is more than 10, 15 years old, or if you see ice on the coils. Ice buildup signals a refrigerant or airflow issue, not a maintenance problem you can clear with a vacuum.
Why a lab-certified mold inspection gives you the only real confirmation
After cleanup, the honest question is whether mold was already growing in the days before the leak was discovered, or whether it established in a wall cavity the drying equipment could not reach. A professional inspection with lab-certified air and surface sampling is the only way to answer that question with documentation you can rely on. TampaBayMold.net offers mold inspections across the Tampa Bay area specifically for homeowners in this situation, with the local Florida experience to know where AC leak mold hides and what the spore counts actually mean.
If the results come back clean, you have documentation confirming the cleanup worked. If they do not, the remediation scope is defined before anyone closes the wall back up. That is exactly when you want to know, before the problem is sealed in rather than solved.
Speed and sequence are what matter here
If you have been asking yourself what should I do after my AC unit leaks to prevent mold, the answer comes down to two things: act within the 24, 48 hour window, and work in the right order. An AC leak becomes a mold problem the moment you stop treating it as an emergency. The steps above are not complicated, but skipping or reordering them is how a manageable cleanup turns into a remediation project.
Do the cleanup work. Verify the moisture readings. Replace what needs replacing. And if you have done all of that and still have a nagging question about what is happening behind the drywall, that question deserves a real answer from someone with the tools to provide it. TampaBayMold.net is the call for that confirmation, no guesswork, no corporate run-around.