
What Happens After A Mold Inspection?
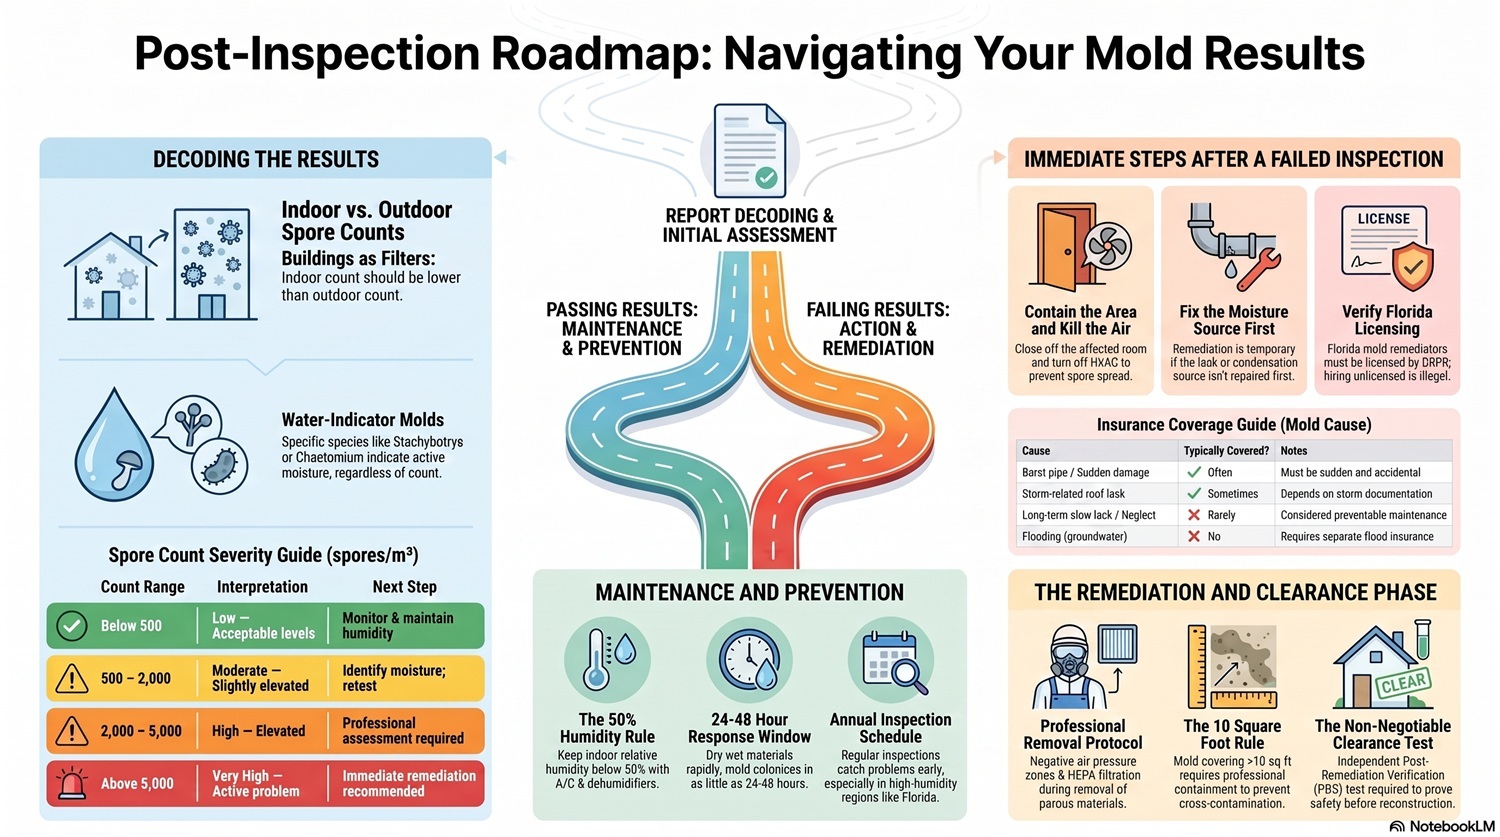
- Spore counts alone don’t tell the full story — inspectors compare indoor and outdoor air samples together, and the ratio between them is what determines a pass or fail.
- If mold is found, the moisture source must be fixed before remediation even begins — skipping this step guarantees the mold comes back.
- A post-remediation clearance test is the only way to confirm the job was done correctly — and it should always be performed by a different company than the one that did the remediation.
- Even a clean inspection result requires a prevention plan — especially in high-humidity states like Florida where conditions favor mold growth year-round.
Your Mold Inspection Is Done — Here’s What Comes Next
Most homeowners breathe a sigh of relief the moment the inspector walks out the door — but that’s actually when the process begins. What happens after a mold inspection depends entirely on what the inspector found, and if you don’t know how to read the results or what actions to take next, you can easily make costly mistakes. Whether your results come back clean or flagged, there’s a clear path forward.
For Florida homeowners especially, understanding the post-inspection process is critical. Florida’s humid subtropical climate creates near-perfect conditions for mold growth year-round, which is why companies like TampaBayMold.net focus specifically on the unique moisture challenges that come with living in this region. Knowing what to expect after your inspection puts you in control of the situation rather than at the mercy of it.
How to Read Your Mold Inspection Report
Your inspection report will typically include air sample results, surface sample results (if swabs were taken), and a written assessment of visible moisture or mold conditions. The air sample data will show spore types and concentrations measured in spores per cubic meter of air (spores/m³). You’ll usually see results from multiple indoor locations compared against an outdoor baseline sample taken from the same property on the same day.
The report may also include photos of problem areas, moisture meter readings from walls or flooring, and specific recommendations. Don’t skip the recommendations section — it tells you exactly what the inspector believes needs to happen next, whether that’s monitoring, remediation, or simply improving ventilation.
What Mold Spore Count Levels Actually Mean
Spore Count (spores/m³) General Interpretation Typical Next Step Below 500 Low — generally acceptable indoor levels Monitor & maintain humidity 500 – 2,000 Moderate — slightly elevated but not always alarming Identify moisture sources; retest 2,000 – 5,000 High —elevated and remediation likely needed Professional assessment required Above 5,000 Very High — active mold problem present Immediate remediation recommended Note: These ranges are general guidelines. Final interpretation depends on outdoor baseline counts and spore types identified.
Raw numbers only tell part of the story. A reading of 2,000 spores/m³ indoors might be completely acceptable if the outdoor count is 4,000 spores/m³ — or it might signal a serious problem if outdoor counts are only 300 spores/m³. Context is everything when interpreting mold air sample data.
The type of spore also matters significantly. Common outdoor molds like Cladosporium indoors at moderate levels are far less concerning than even small concentrations of Stachybotrys chartarum — commonly known as black mold — which is rarely found outdoors and almost always indicates an active indoor moisture problem.
The Difference Between a Clear and a Failed Mold Inspection
There’s no universal government standard for what constitutes a “passing” or “failing” mold inspection in the United States — which surprises most homeowners. Instead, inspectors use professional judgment based on the comparison of indoor versus outdoor spore counts, the types of mold present, and visible evidence of moisture damage or active growth.
The core rule of thumb: Indoor spore counts should be lower than outdoor counts, and the types of mold found indoors should reflect what’s naturally present in the outdoor environment. Any significant deviation from this pattern points to an indoor mold source.
What a Passing Inspection Result Looks Like
A clean result means indoor spore counts are at or below outdoor levels, no elevated concentrations of water-indicator molds like Stachybotrys or Chaetomium were detected, and no visible mold growth was observed. The inspector’s recommendations will typically focus on preventive measures rather than remediation — things like improving bathroom ventilation or maintaining HVAC filters.
What a Failed Inspection Result Looks Like
A failed result typically shows indoor spore counts significantly higher than outdoor counts, the presence of mold species associated with water damage, or both. In some cases the air samples may look relatively normal but visible mold growth or elevated moisture readings during the physical inspection are enough to warrant remediation — especially if mold is found inside wall cavities or under flooring where spores haven’t yet become airborne.
Why Indoor Spore Counts Must Be Lower Than Outdoor Counts
Buildings act as filters. Healthy homes with proper ventilation, functioning HVAC systems, and no active moisture intrusion will naturally have lower spore concentrations indoors than outside. When indoor counts exceed outdoor counts, it tells inspectors that mold is actively generating spores somewhere inside the structure — even if you can’t see it.
Immediate Steps to Take After Mold Is Found
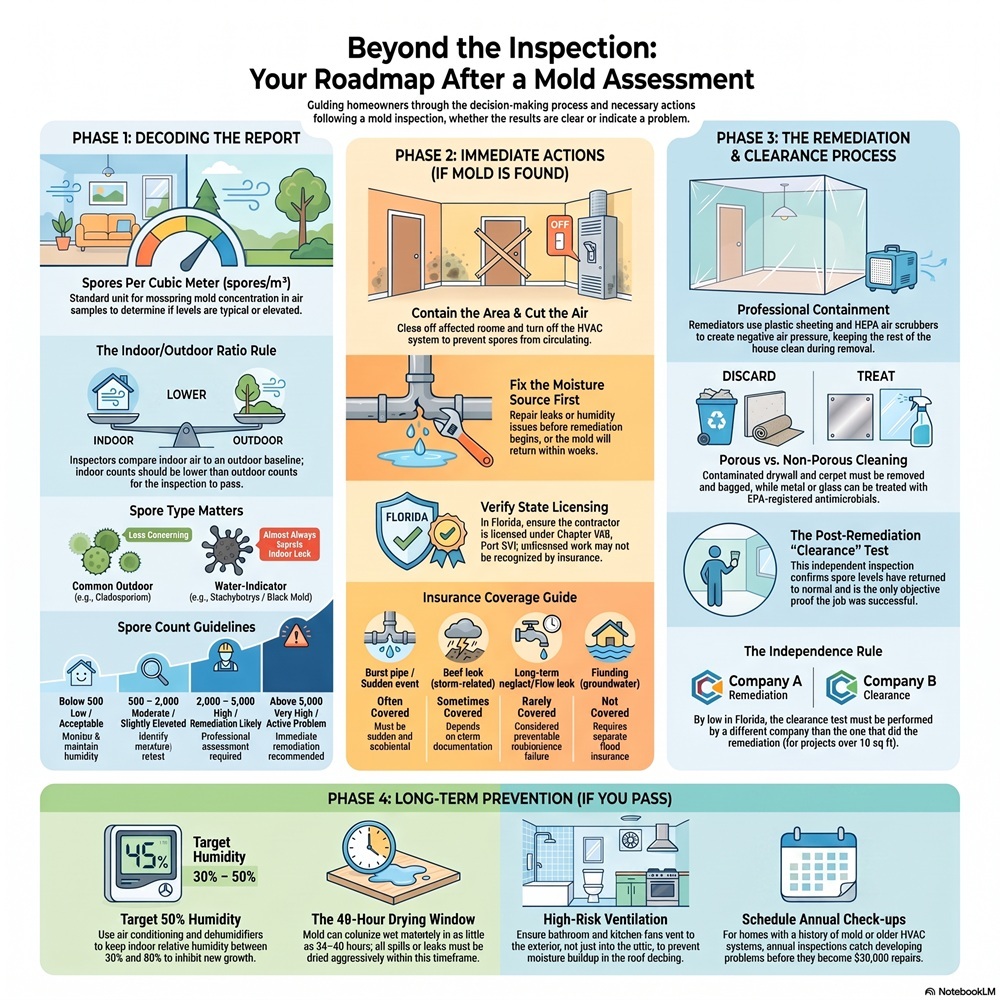
If your inspection flagged a mold problem, the clock starts immediately. Mold spreads by releasing spores into the air, and any disturbance to an affected area — including normal foot traffic and HVAC operation — can accelerate that spread. The goal in the first 24–48 hours is to stop conditions from getting worse while you arrange professional remediation.
Resist the urge to start cleaning the mold yourself. For anything beyond a small, isolated surface spot (generally defined as less than 10 square feet by EPA guidelines), DIY cleaning without proper containment can actually spread spores to previously unaffected areas and make the remediation job significantly larger and more expensive.
1. Contain the Affected Area Right Away
Close off the room or area where mold was identified. Turn off any fans, the HVAC system, or portable air units that circulate air through that space — running forced air through a mold-affected area spreads spores throughout the entire home. If possible, seal doorways with plastic sheeting until a remediation professional can establish proper negative air pressure containment.
2. Fix the Moisture Source First
This is the step that determines whether remediation actually works long-term. If a leaking pipe, roof intrusion, foundation seepage, or HVAC condensation issue caused the mold growth, that source must be fully repaired before any remediation work begins. Any licensed remediator worth hiring will insist on this — removing mold from a surface that’s still wet is a temporary fix that gives mold the exact conditions it needs to return within weeks.
3. Contact a Florida Licensed Mold Remediation Specialist
In Florida, mold remediators must be licensed by the Florida Department of Business and Professional Regulation (DBPR) under Chapter 468, Part XVI of Florida Statutes. Always verify a contractor’s license before signing anything — you can check directly on the DBPR website using their license lookup tool. An unlicensed contractor performing remediation in Florida is operating illegally, and any work they perform won’t be recognized by insurance companies or future home inspectors.
4. Notify Your Insurance Company
Call your homeowners insurance provider as soon as mold is confirmed by a licensed inspector. Give them a copy of the inspection report and ask specifically about your mold remediation coverage limits — many standard policies cap mold coverage between $1,000 and $10,000, which may not cover the full cost of a significant remediation job.
Document everything before remediation begins. Take your own photos and videos of all affected areas, keep all inspection invoices and reports, and get the remediation estimate in writing. Insurance adjusters will want this documentation, and gaps in your records can result in denied or reduced claims.
One important distinction insurers make: mold resulting from a sudden, accidental event — like a burst pipe — is more likely to be covered than mold caused by long-term neglect or chronic moisture issues. Knowing this difference upfront helps you frame your claim correctly from the start.
Mold Cause Typically Covered? Notes Burst pipe or sudden water damage ✓ Often covered Must be sudden and accidental Roof leak (storm-related) ✓ Sometimes covered Depends on policy and storm documentation Long-term slow leak or neglect ✗ Rarely covered Considered preventable by insurer Flooding (groundwater) ✗ Not under standard policy Requires separate flood insurance HVAC condensation buildup ✗ Rarely covered Often classified as maintenance failure
The Mold Remediation Process Explained
Professional mold remediation follows a structured protocol designed to remove mold safely without cross-contaminating the rest of the home. The process is more involved than most homeowners expect — it’s not simply spraying a surface and wiping it clean. Depending on the extent of the mold growth and the materials affected, remediation can involve physical removal of building materials, HEPA air filtration, antimicrobial treatments, and structural drying before any rebuilding begins.
How Long Remediation Takes
A small, contained mold problem — say, mold in a single bathroom or a localized section of drywall — can typically be remediated in one to three days. Larger infestations involving wall cavities, subfloor materials, or HVAC systems can take anywhere from one to two weeks. Homes with extensive structural damage from long-term moisture intrusion may require significantly longer timelines, particularly if drywall, insulation, or floor joists need full replacement and adequate drying time before reconstruction.
What Remediators Actually Do During the Process
Licensed remediators begin by establishing a negative air pressure containment zone around the affected area using heavy-duty plastic sheeting and industrial air scrubbers equipped with HEPA filters. This prevents spores disturbed during removal from migrating into clean areas of the home. Contaminated porous materials like drywall, insulation, and carpet are bagged, sealed, and disposed of according to EPA guidelines — these materials cannot be cleaned and must be removed entirely. Non-porous surfaces like concrete, metal, and glass are cleaned with HEPA vacuums and treated with EPA-registered antimicrobial agents. The area is then dried to specific moisture content levels using commercial dehumidifiers and air movers before any reconstruction takes place.
Post-Remediation: The Clearance Test
Once remediation is complete, the work isn’t officially done until a clearance test — also called a post-remediation verification (PRV) — confirms that spore levels have returned to normal. This is a separate mold inspection performed after the remediation company has finished and cleaned up, conducted under the same conditions as the original inspection.
The clearance test uses air sampling and sometimes surface sampling to verify that indoor spore counts are now comparable to outdoor baseline levels and that no elevated concentrations of the originally identified mold species remain. Only when these conditions are met should any reconstruction — replacing drywall, reinstalling insulation, repainting — begin. Rebuilding before clearance is confirmed risks sealing active mold behind new materials.
Why a Clearance Test Is Non-Negotiable
Without a clearance test, there is no objective proof that the remediation was successful. Visual confirmation alone is not sufficient — mold spores are microscopic and invisible to the naked eye. A surface can look completely clean while still harboring spore concentrations high enough to trigger regrowth within weeks. The clearance test is the only mechanism that separates a completed remediation job from one that simply looks finished.
If you’re selling a home or dealing with a real estate transaction, a documented clearance test from a licensed inspector becomes essential paperwork. Many buyers and their lenders will require it as a condition of closing if any prior mold history is disclosed.
Who Should Perform the Clearance Test
This point is critical: the clearance test must be performed by a different, independent company than the one that performed the remediation unless the visible mold is less than 10 sq ft. Having the same contractor inspect their own work is a possible conflict of interest, and in Florida, it’s actually against regulations — licensed mold remediators are prohibited from both performing remediation and conducting the inspection on the same project under Florida Statutes unless visible mold is less than 10 sq ft. or the remediation project takes place 12 months or more after the mold inspection.
What to Do If Your Inspection Comes Back Clean
A clean mold inspection is genuinely good news — but it’s a snapshot in time, not a permanent guarantee. The absence of elevated spore counts today simply means conditions in your home are currently acceptable. In a climate like Florida’s, where relative humidity regularly exceeds 70% outdoors, those conditions can shift quickly if moisture controls are not actively maintained.
Use a clean result as a baseline. Keep a copy of your inspection report with your home records — it establishes a documented starting point that future inspectors or buyers can reference. Note any areas the inspector flagged as “monitor-worthy” even if they didn’t trigger remediation recommendations, and address them proactively rather than waiting for the next inspection to find a problem.
Mold Prevention After a Clear Inspection
Prevention is far cheaper than remediation. The average professional mold remediation in the United States costs between $1,500 and $9,000 depending on scope — and in severe cases involving structural materials or HVAC systems, costs can exceed $30,000. The investments required to prevent mold from establishing are a fraction of that figure.
The four most effective prevention strategies for Florida homeowners address the root causes of mold growth directly: humidity, moisture intrusion, airflow, and early detection. None of them are complicated, but all of them require consistency.
- Keep indoor relative humidity below 50% using air conditioning and dehumidifiers
- Repair any water leaks within 24–48 hours — mold can begin colonizing wet materials in as little as 24 to 48 hours under the right conditions
- Run bathroom and kitchen exhaust fans during and for at least 15–20 minutes after use
- Inspect your roof, windows, and foundation annually for signs of water intrusion
- Replace HVAC filters every 1–3 months and schedule professional HVAC cleaning annually
- Use mold-resistant drywall and paint in bathrooms, laundry rooms, and any below-grade spaces
The goal isn’t to create a sterile environment — mold spores exist everywhere in nature and can never be fully eliminated from indoor air. The goal is to deny mold the one thing it absolutely requires to grow: sustained moisture. Control that, and you control your mold risk.
1. Keep Indoor Humidity Below 50%
This is the single most impactful thing a Florida homeowner can do. The EPA recommends keeping indoor relative humidity between 30% and 50% to inhibit mold growth. In practice, achieving this in Florida during summer months means running your air conditioning consistently — even when temperatures feel manageable — and supplementing with a dedicated dehumidifier in areas like basements, crawl spaces, or rooms with poor HVAC airflow. A digital hygrometer, which costs as little as $10 to $20 at most hardware stores, lets you monitor humidity levels in real time so you’re not guessing.
2. Fix Leaks Within 24–48 Hours
A slow drip under a sink or a small roof leak after a storm can seem minor — but within 24 to 48 hours, wet building materials like drywall, wood framing, and insulation provide everything mold needs to begin colonizing. The repair doesn’t need to be perfect immediately, but the moisture does need to be stopped and the wet materials dried aggressively using fans and dehumidifiers while you arrange the full fix. Any materials that stayed saturated for more than 48 hours should be inspected carefully before being closed back up.
3. Improve Ventilation in High-Risk Areas
Bathrooms, laundry rooms, kitchens, and attics are where most Florida homes develop mold problems first. In bathrooms, make sure exhaust fans are actually vented to the exterior — not just into the attic space, which is an extremely common installation error that pumps moisture-laden air directly into one of the most mold-vulnerable areas of the home. Attics specifically need adequate soffit and ridge ventilation to prevent condensation from building up on roof decking during the temperature swings between Florida’s hot days and cooler nights.
4. Schedule Annual Mold Inspections
Annual inspections do two things: they catch developing problems before they become expensive, and they build a documented history of your home’s air quality over time. For homes with prior mold history, a history of water damage, or older HVAC systems, annual inspections are especially valuable. Think of it the same way you think about an annual HVAC service or a roof inspection — a small, predictable cost that protects against a much larger, unpredictable one.
A Clean Bill of Mold Health Means Nothing Without Prevention
Getting a clean mold inspection report is a win — but it’s not the finish line. Mold doesn’t care that your last inspection was clear. It responds to conditions, not calendars. In Florida’s humid environment, the gap between a clean home and a mold problem can close faster than most homeowners expect. The post-inspection process, whether your result was clear or not, ultimately leads to the same place: building habits and home systems that make mold growth difficult to establish in the first place. That’s where the real protection lives.
Frequently Asked Questions
How Long After a Mold Inspection Can Remediation Begin?
Remediation can technically begin as soon as you have your inspection results and have identified and repaired the underlying moisture source. There’s no required waiting period — in fact, starting quickly is encouraged, especially in Florida’s climate where mold can spread rapidly.
That said, rushing into remediation before the moisture source is fixed is a common and costly mistake. Make sure any leaks, water intrusion, or HVAC condensation issues are fully resolved first. A licensed remediator will assess the moisture conditions before starting work and may require proof that the source has been addressed before beginning containment and removal.
Can I Stay in My Home During Mold Remediation?
It depends on the location and scale of the mold problem. For small, isolated remediation jobs — a single bathroom or a localized section of drywall — staying in the home is often possible as long as the affected area is properly contained and you’re not in close proximity to the work zone. Remediators establish negative air pressure containment specifically to prevent spores from spreading to occupied areas.
For larger remediation projects involving multiple rooms, HVAC systems, or extensive structural materials, temporarily relocating is strongly advisable — particularly for anyone with respiratory conditions, allergies, asthma, or compromised immune systems. Children and elderly individuals should also leave the home during significant remediation work. Ask your remediator directly about displacement expectations when you receive your estimate.
How Much Does Mold Remediation Cost After an Inspection?
Costs vary significantly based on the size of the affected area, the materials involved, and the accessibility of the mold. Small surface remediation jobs may run as low as $1200 to $2,500. Mid-range projects involving drywall removal and structural drying typically fall between $3,000 and $10,000. Severe cases involving HVAC contamination, subfloor removal, or extensive square footage can exceed $20,000 to $30,000 or more.
Always get at least two to three written estimates from licensed remediators before committing. Be wary of quotes that seem unusually low — underbidding is common in the remediation industry, and scope changes mid-project can inflate the final bill well beyond the initial estimate. The inspection report your assessor provided gives you a clear scope of work to share with each contractor so you’re comparing equivalent proposals.
Does Homeowners Insurance Cover Mold Remediation?
Standard homeowners insurance policies in Florida often include limited mold coverage — typically between $1,000 and $10,000 — but only when the mold resulted from a covered peril like a sudden burst pipe or storm-related water intrusion. Mold caused by long-term neglect, slow leaks, or chronic humidity issues is almost universally excluded. Review your specific policy language carefully and contact your insurer immediately after receiving a positive mold inspection result to understand exactly what your coverage includes before remediation begins.
How Often Should I Get a Mold Inspection After Remediation?
After a successful remediation confirmed by a clearance test, most licensed mold assessors recommend scheduling a follow-up inspection six to twelve months later. This first follow-up establishes whether the remediation held and whether the moisture source fix was fully effective under real-world seasonal conditions — particularly important in Florida where the wet season between June and September creates peak mold pressure.
After that initial follow-up comes back clean, annual inspections are the standard recommendation for homes with any prior mold history. For homes without prior issues, inspections every one to two years are typically sufficient — though any new water event like a roof leak, flooding, or plumbing failure should trigger an immediate inspection regardless of when the last one occurred.
Florida Mold Specialist provides licensed mold assessment and post-remediation clearance testing across Florida, helping homeowners protect their properties with the documentation and expert evaluation the state’s climate demands.
2 Replies to “What Happens After A Mold Inspection?”
Comments are closed.